
Companies that use QuickBooks Desktop (QBD) can seamlessly integrate their Mothernode account with their QBD account to electronically transfer Mothernode Invoices and Purchase Orders (MN Enterprise Edition) or Motherndoe Quotes to QBD using all other Mothernode Editions.
QuickBooks Desktop Setup
To get started there are a few QBD setup items that you will need to prepare before you can successfully connect your Mothernode CRM account to QBD and begin syncing transactions. The processes included herein are specified for QBD 2021. Some screenshots and /or functional locations may vary per edition. Make sure all these settings are correct before proceeding. If you cannot locate these settings in your edition of QBD contact your Intuit Pro Advisor or visit Intuit online at www.intuit.com
Set up Sales Tax
Make sure you are set to collect sales tax.
These Instructions are provided by Intuit. Click here to read Intuit’s instructions on how to set up sales tax.
Note: Before you set up your sales tax items/groups, make sure you check the tax rates and requirements with your tax agency.
To start recording sales tax in QuickBooks Desktop, you need to turn on this feature and set up sales tax items or tax groups.
- Go to the Edit menu, then select Preferences.
- On the Preferences window, select Sales Tax then go to the Company Preferences tab.
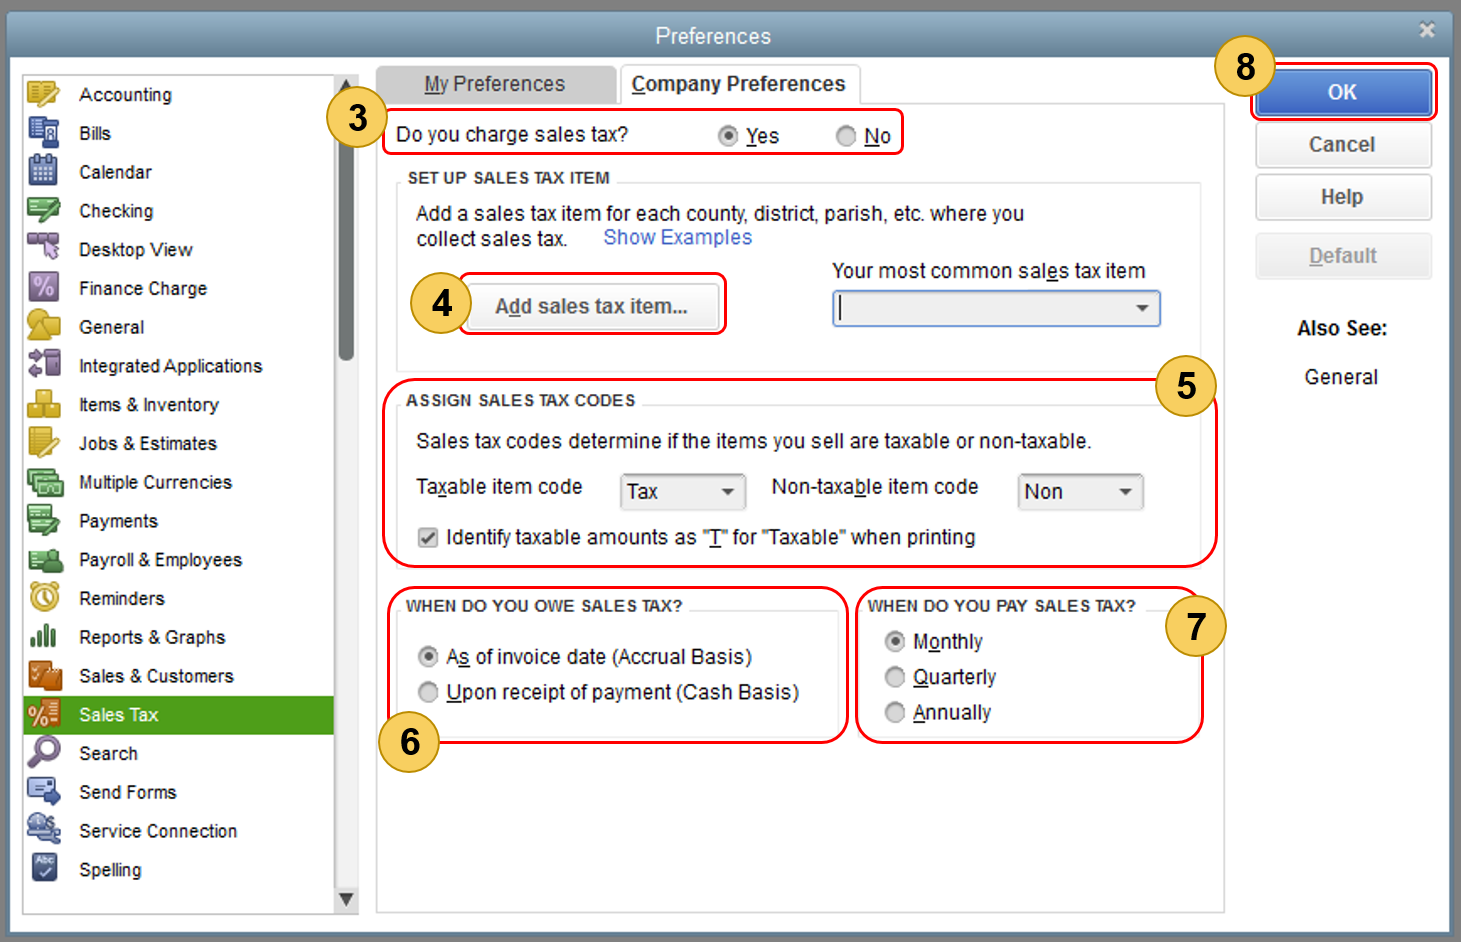
- Select Yes to turn on sales tax.
- Set up the sales tax items or sales tax groups for each county, district, city, etc. where you collect sales tax. Click Add sales tax item to do this.
- Assign sales tax codes. Sales tax codes help you track taxable and non-taxable sales and/or customers. Setting up and assigning the correct sales tax code allows you to run a report that divides the total taxable and non-taxable sales. When you turn on sales tax in QuickBooks, two tax codes are automatically created: TAX (taxable) and NON (non-taxable). TAX is used for items and customers that you need to collect tax for. NON is used for items and customers that are exempted from tax such as non-profit organizations, out-of state sales, or items that your customers will resell.
- Set the Sales tax basis (Accrual or Cash). Take into account your company’s accounting an preference.
- Set up your preference for paying the sales tax (Monthly, Quarterly, Annually).
- Select OK.
Set up Classes
For Mothernode Customers that are syncing transactions for multiple company accounts, you will need to set up Classes within your QBD account. Click here to read Intuit’s instructions on how to set up classes.
New to class tracking? Classes represent meaningful segments in your company, like store departments or product lines. Check out our class tracking overview to learn if it’s the right tool for you and how to get started.
After you turn on class tracking, create a class for each segment in your business. You can organize your customer and vendor transactions by class. This lets you get clearer insights on your sales, expenses, or profitability by business segment.
We’ll help you set up your classes.
How to add a new class
Remember, it’s best to keep it simple. Too many classes can sometimes become time-consuming to work with. And the more straightforward your classes are, the easier it is to understand your reports.
Note: Only admins in QuickBooks Plus and Advanced can create classes. If you don’t have Plus or Advanced, it’s easy to upgrade your plan once you’re ready to use class tracking.
- Go to Settings ⚙ and then All Lists.
- Select Classes.
- Select New. Give this class a name.
- To add a sub-class, select Is a sub-class and select the main class. You can nest up to five classes.
- Select Save.
Once you’re all set up, you can start to track your transactions by class.
Learn more about usage limits.
How to delete a class
If you no longer need a class, you can make it inactive. Once it’s inactive, it no longer counts toward your usage limits.
- Go to Settings ⚙ and then All Lists.
- Select Classes.
- Find the class you want to delete.
- Select the small arrow ▼ next to Run report, then Make inactive (reduces usage).
How to restore a deleted class
If you need to, you can restore a class you deleted.
- Go to Settings ⚙ and then All Lists.
- Select Classes.
- Select Settings ⚙ next the Print icon, then select Include inactive.
- Find the class you want to restore, then select Make active.
